Rubik’s Futuro Cube Suite
RFC Suite – basic functions
RFC Suite is important add-on software for the Rubik’s Futuro Cube for Windows, MacOS and Linux. It allows you to: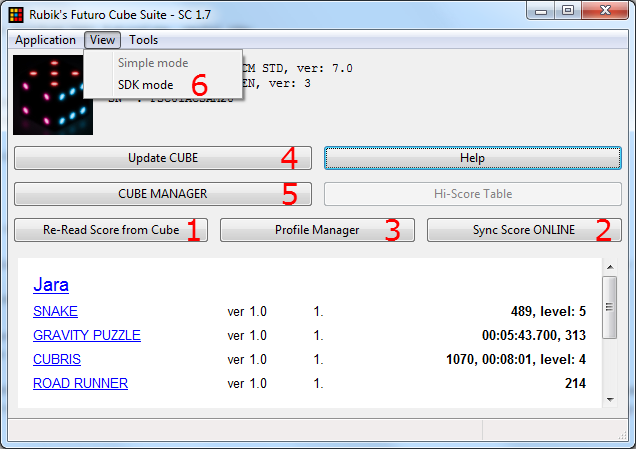
1. Read your high-score on your cube.
2. Upload your score to the server.
3. Manage you player profiles – activate, change nicknames and upload profile pictures.
4. Activate cube upgrades.
5. Install new games/apps, change languages, move new games inside the cube-menus.
6. Develop new games/apps, compile and debug, connect to cube shell command line.
Before reading, install the latest version of RFCSuite and check that the RFCSuite recognizes the cube after connecting via USB.
Browsing the score – FW >= 7.0
Once the cube is connected, all stored scores are displayed automatically on the bottom part of the RFCSuite. Using the blue links, you can go directly to our website-either to the PLAYER page or the GAME page. Press “Re-read score from cube”, if you need to refresh the score. (diagram 1).
Uploading the score to WEB
Press “Sync Score ONLINE” (diagram 2). It sends scores from all profiles and adds you to the global ranking. Your score entries will be wiped except for the highest from all profiles and games. That way, your cube can notify you when you break your record. Also note that all your previously wiped results will be available on the website for future viewing.
Profile management
Each player who wants to compete must have his/her own profile. There are up to 4 profiles available in each cube. Each profile in a cube has its own nickname and picture. Pressing “Profile Manager” (diagram 3) opens the profile manager window. Note that you must be connected to internet.
How to upgrade the cube
If there is new FW available for Rubik’s Futuro Cube, you should upgrade your cube. There will be new functions, games and occasional bug fixes. Upgrade by following these steps:
1. Download the latest FW from Support.
2. Connect your cube to RFCSuite using your USB cable.
3. Press “Update Cube,” and locate your previously downloaded FW (extension is .pkg).
4. Wait a few seconds until the upgrade finishes. Done!
 Occasionally, when updating from an older version of FW, a message about missing audio data can appear. Use the same steps as described in “Cube Manager – Changing language”.
Cube manager – games/app management
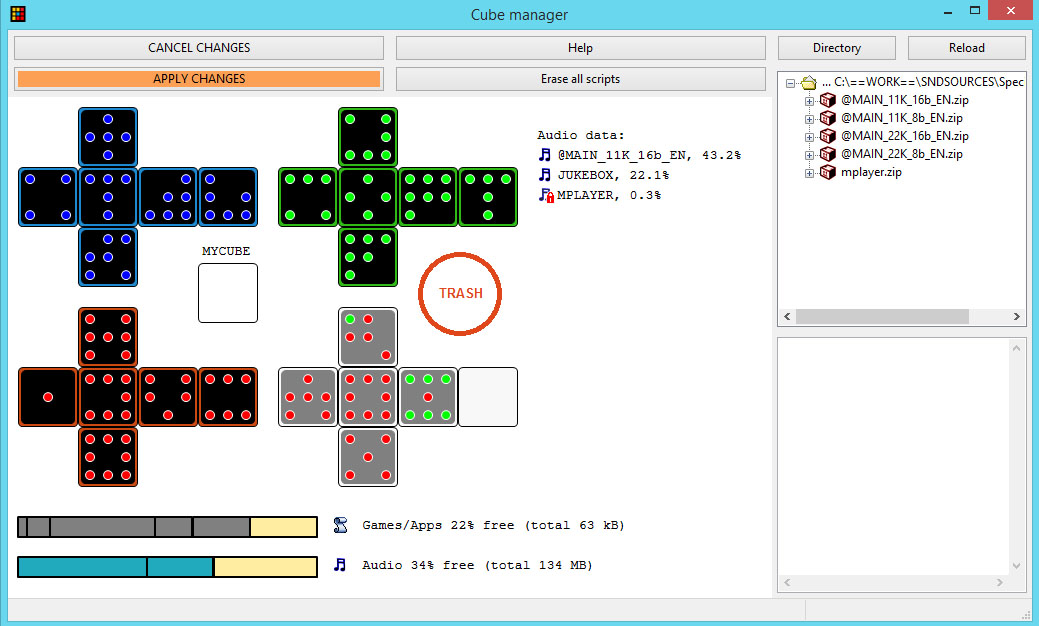
Press “CUBE MANAGER” from the main RFCSuite window. It opens a new window where you can install new games and applications and you can also set up their positions in different menus. You can also modify sounds and language resources.
All the games and applications which have been uploaded to the cube from the beginning, are so-called “built-in” apps. They are part of the firmware and can only be changed by actualizing the FW. All the other games and apps which you can download, are called scripts. The script can be archived along with the sound, and as such it is an installation package. Read further to find out how to download these files to your cube.
Installing scripts and sound to the cube
First, download the installation file for an app (game) or sound to your computer. The easiest way is to create a new folder where you save all the installation files that you want to upload to the cube. Open this folder in the cube manager by pressing “Directory,” top right. If you’ve just added a new installation file, simply click “Reload.” On the right-side panel the contents of the folder will appear, and for each recognized file one of the following icons will appear:
![]() - directory, browse your harddrive using these icons (these can’t be downloaded to your cube),
- directory, browse your harddrive using these icons (these can’t be downloaded to your cube),
![]() - installation package (.zip) is an archive, which contains scripts and sounds
- installation package (.zip) is an archive, which contains scripts and sounds
(![]() ) - script (.amx) inside the package (individual files cannot be downloaded, you must accept the whole package),
) - script (.amx) inside the package (individual files cannot be downloaded, you must accept the whole package),
(![]() ) – one of the audio files (.wav) saved in the package (individual files cannot be downloaded, you must accept the whole package),
) – one of the audio files (.wav) saved in the package (individual files cannot be downloaded, you must accept the whole package),
![]() - individual script without sound (.amx),
- individual script without sound (.amx),
![]() - individual sound data (.wav) saved in the common directory, which may be used by one or more applications.
- individual sound data (.wav) saved in the common directory, which may be used by one or more applications.
Move the mouse from the right panel to one of the 4 cubes, which make up the menu. The script will change its icon. Scripts are identified by their grey backgrounds. Apps have a black background. Unlike the built-in apps, you can move the scripts around, or delete them, by moving them into the red circle (trash). If you place a script in one of the blue, green or red menus, you will hide one of the built-in apps and it will not be able to play. If you don’t want to give up any of the apps, use the white menu, which is empty (the white menu opens after the red menu, so the cube will have 4 menus).
When you move all your new apps to your cube, make sure they are in the right place. After pressing “Apply Changes,” the apps will be copied to your cube. An orange button will blink, if you’ve made changes but have yet to save them. If you don’t want to change anything and you made changes by accident, click on “Cancel Changes,” and the cube manager will re-read the data that is currently in your cube and will forget the aforementioned changes.
Installation of special scripts
In addition to placing icons in a script from the menu, you can put the script in the position marked “MY CUBE.” You start this script by repeating the gesture to jump into the menu, when you’re already in the menu. “My Cube” was designed to run such applications which can easily be identified from others, but you can also use it to change your profile, or your favorite game.
Another option is to choose a script that replaces the standard menu. It should be a script written for this purpose, because otherwise you will not be able to run applications. Place this script into one of the menus, right-click the icon and from the context-menu choose “Set/unset Run instead of MENU.” A red sign will appear on the icon. Re-select this option to cancel the item.
The last option is to choose a script that runs during charging and replaces the built-in behavior. Similar to replaced menu described above, right-click, and in the context-menu choose “Set/unset Run instead of CHARGING.”
Sound data
Installation packages contain not only scripts but also sound files in the form of libraries. After moving scripts to the network from any menu, the name of the added sound libraries appear in the right column headed “Audio data”. Here you can see three types of sound libraries:
1. The main sound library starts with the “@” sign. It is used for built-in apps and most of the scripts. It exists in several languages and several sizes depending on the quality of the sound.
2. The independent sound library isn’t directly connected with a specific script (it can be used with different scripts) and therefore, it can be erased separately.
3. (![]() )
)
The networked audio library belongs to a particular script and its installation and deletion can be done only by installing or deleting the appropriate script.
Deletion of data and the capacity of the cube
The Futuro Cube has two independent memories. The first serves as the script memory and the second as the sound memory. The Cube Manager automatically decides what data will be saved where. If the new files don’t fit in the cube, they cannot be moved to the cube. Before you will be able to move a file, you have to clear space in the memory by erasing some data.
If you don’t have enough memory for your scripts, you’ll have to erase some from the memory. To do so, move the icon to be erased to the red circle, titled “trash.” If you don’t have enough memory for your sound, we recommend using a sound library file with lower sound quality (you can save cca 50%-75% capacity). Alternatively, you can erase either the script with the networked sound library, or the independent sound library.
How much of your script or sound library is occupied can easily be seen by clicking on one of the horizontal “memory full” indicators, which are displayed on the bottom left.
The upper indicator shows the memory is full of scripts. Each script is displayed as a grey rectangle whose length corresponds relative to the size of the script. By clicking on the rectangle, the appropriate icon is indicated as well as any connected audio library.
The lower indicator shows the memory is full of audio data. The independent audio libraries are displayed in turquoise; its connected library is grey. Clicking on the rectangle highlights the appropriate audio library.
Don’t forget that so long as you don’t confirm the changes by clicking “APPLY CHANGES,” nothing will happen. At any point, you can revert to the previous state by clicking “CANCEL CHANGES.”
Changing languages
Here you will find everything you need to know about changing languages on the cube:
* Delete the original main audio library.
* Download the main audio library of chosen language and quality. The more Hz and bits, the better the sound quality but the library will require more space. We recommend 11kHz and 16bit, this way you will still have lots of room for sounds of new apps as well as your own sounds.
* Finally, move the new main audio library to the cube and select “APPLY CHANGES.” Be aware that downloading the main audio library in full quality takes 8 min.